Solar power is an increasingly popular choice for powering boats and RVs, as it is a clean, renewable, and cost-effective alternative to traditional fossil fuels.
Solar panels, also known as photovoltaic (PV) panels, convert sunlight into electricity that can be used to power appliances, lights, and other electrical devices on a boat or RV. The size and power of the solar panels will depend on the specific needs of the boat or RV, as well as the amount of sunlight the panels will receive.
One of the key benefits of using solar power on a boat or RV is the ability to be off-grid. This means that a boat or RV can be parked in a remote location and still have access to power, without the need to rely on a generator or shore power. Additionally, solar power is silent and produces no emissions, which makes it a great choice for boating and RVing in sensitive or protected areas.
Solar power systems for boats and RVs typically include the solar panels, a charge controller, and a battery bank. The charge controller is responsible for ensuring that the batteries are not overcharged or undercharged, while the battery bank stores the electricity generated by the solar panels.
When it comes to solar power for boats and RVs, there are different options for the solar panel, such as flexible or semi-flexible solar panels, which are easy to install and can be attached to curved surfaces such as the deck or cabin of a boat, or traditional rigid solar panels which are more powerful but not as adaptable.
In conclusion, solar power is a clean, renewable, and cost-effective alternative to traditional fossil fuels for powering boats and RVs. It allows boaters and RVers to be off-grid, and it doesn’t produce emissions or noise. Solar power systems for boats and RVs include solar panels, charge controller, and a battery bank. There are different options for the solar panel such as flexible or traditional rigid solar panels.
Nova Scotia’s solar industry is growing. There was some uncertainty earlier this year when Nova Scotia Power proposed a fee for solar users, but after the government intervened, the solar sector saw another record-breaking year.
The solar industry in Nova Scotia is growing.
Each year for the past five to six years, the province has seen a record number of solar panel installations and there are now about 6,000 Nova Scotians with solar panels.
“With electricity prices rising, people see solar as a way to mitigate increases,” said David Brushett, chair of Solar Nova Scotia.
“Also, people care about the issues ofclimate changeand see it as a way to take action to help reduce emissions.”
Another factor contributing to growth is the cost. Over the past decade, the price of solar panels has dropped nearly 90 percent.
“The sector has really progressed a lot over the last couple of years,” said Patrick Bateman, an energy sector consultant.
Bateman was one of the hundreds participating in the Atlantic Canada solar summit held at the Halifax Convention Centre this week. The conference offers those in the industry a chance to look at advancements in solar technology and discuss the sector’s future.
“Technology changes all the time so it’s of critical importance for people to get together, solve problems and create new opportunities,” said Bateman.
Growth in the province has largely been in the residential market, but there is hope that there will be growth in the commercial market next year.
David Miller, the director of clean electricity with the Department of Energy and Renewables, says growth in the commercial market was previously limited due to regulations but change is underway.
“Previously the max installed limit was 100 kilowatts, so it’s now 200 for some businesses and up to 1,000 for others,” he said.
In addition to that, there are new business deductions and tax incentives for businesses looking to go solar.
And while the price of solar has dropped significantly in recent years, the upfront cost is still too high for many and so the province is looking at community solar gardens as a way to make solar more accessible to all Nova Scotians.
“We’ll see larger solar projects constructed and allow individuals to subscribe to them, so you don’t have to own it, it doesn’t have to be on your roof,” he said.
“We see (this project as) opportunities to support lower-income families or middle-income families who might want to participate in the clean energy space but can’t afford that upfront cost.”
Nova Scotia has a goal of having 80 percent of its electricity come from renewable sources by 2030. While solar will play a role in this, the power generated by solar in the province is just a very small portion of what’s needed.
“Solar is a solution that you combine with other solutions,” said Bateman.
“Balancing solar with other existing resources is how we get to a cleaner future.”
LiFePO4, also known as lithium iron phosphate, is a type of lithium-ion battery that is commonly used in a wide range of applications, including electric vehicles, grid energy storage, and portable electronics.
One of the main advantages of LiFePO4 batteries is their high energy density, which means they can store a large amount of energy in a relatively small package. This makes them well-suited for use in electric vehicles, where space is often at a premium. Additionally, LiFePO4 batteries have a relatively long lifespan, with some manufacturers claiming that their batteries can last for over 20 years.
Another key benefit of LiFePO4 batteries is their safety. Unlike traditional lithium-ion batteries, which use a cobalt-based cathode, LiFePO4 batteries use an iron-based cathode. This makes them less susceptible to thermal runaway, a condition where a battery overheats and can potentially catch fire. Additionally, LiFePO4 batteries are less likely to experience voltage sag, a condition where the voltage drops rapidly during discharge.
In addition to the benefits above, LiFePO4 batteries also have some drawbacks. They are relatively heavy compared to other types of lithium-ion batteries, which can be a disadvantage for portable electronics. Additionally, they have a lower voltage than other types of lithium-ion batteries, which means they require more cells to achieve the same voltage.
In conclusion, LiFePO4 batteries are a type of lithium-ion battery that offers several benefits over traditional lithium-ion batteries. They have a high energy density, a long lifespan, and are relatively safe. They are commonly used in electric vehicles, grid energy storage, and portable electronics. However, they are relatively heavy and have a lower voltage than other types of lithium-ion batteries.
Hurricane Ian’s catastrophic winds and flooding are likely to bring long-lasting power outages to large parts of Florida. The storm is the latest in a line of hurricanes and extreme heat and cold events that have knocked out power to millions of Americans in recent years for days at a time.
In many disasters- and outage-prone areas, people are starting to ask whether investing in rooftop solar and battery storage systems can keep the lights on and the air conditioner running when the power grid can’t.
When the grid goes down, most solar systems that lack a battery will also shut down. But with batteries, a home can disconnect from the grid. Each day, the sun powers the home and charges up the batteries, which provide power through the night.
Our team at Berkeley Lab explored what it would take for homes and commercial buildings to ride out long power outages, of three days or more, with solar and batteries.
How much can solar + storage do?
For a new report, we modeled a generic power outage for every county in the U.S., testing whether a rooftop solar system combined with a 10- or 30-kilowatt-hour battery could power critical loads, like refrigeration, lighting, internet service, and well pumps; if it could go further and also power heating and air conditioning; or if it could even power a whole home.
To put that into perspective, the most popular battery on the market, the Tesla Powerwall, has just over 13 kWh of storage.
In general, we found that even a modest system of solar plus one battery can power critical loads in a home for days at a time, practically anywhere in the country.
But our maps show that providing backup for cooling and heat can be a challenge, though not an insurmountable one. Homes in the Southeast and Pacific Northwest often have power-hogging electric resistance heaters, exceeding the capability of solar and storage during winter outages. Homes with efficient heat pumps performed better. Summer air conditioning load can be heavy in the Southwest, making it harder to meet all cooling needs with solar and storage in a summer blackout.
Larger solar and battery systems can help, but meeting demand during outages still depends on the weather, how energy efficient the home is, and other factors. For example, simple thermostat adjustments during power outages reduce heating and cooling needs and allow solar with storage to maintain backup power over longer periods.
The ability to power commercial buildings varies widely, depending on the building type. Schools and big-box retail stores, with sufficient roof space for solar relative to building power demand, fare much better than multistory, energy-intensive buildings like hospitals.
How solar would have handled 10 past disasters
We also looked at 10 real-world outage events from 2017 to 2020, including hurricanes, wildfires, and storms, and modeled building performance for specific locations and real weather patterns during and after the outages.
We found that in seven of the outages, most homes would have been able to maintain critical loads plus heating and cooling using solar with 30 kWh of storage, or just over two Powerwalls.
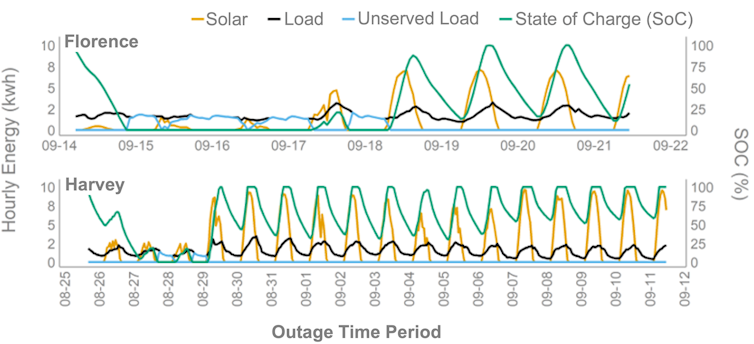
But the weather around the outage can have a big impact, especially for hurricanes. AfterHurricane Florenceknocked out power in North Carolina in 2018, cloudy skies hung around for three days, dimming or even stopping solar panels’ output.
Hurricane Harvey, on the other hand, slammed the Texas coast in August 2017 but moved on to cause widespread damage elsewhere in Texas. The skies over Corpus Christi cleared even as it took a week or more to get power restored. Solar and storage would have been a big help in that case, providing virtually all power needs for a typical single-family home, once the skies cleared.
How a typical home would have done with solar and 30 kWh of storage after hurricanes Florence and Harvey. The light blue line shows the short periods of ‘unserved load,’ or shortfalls in meeting power demand, right after the storms. The state of charge shows batteries were able to stretch solar power through the night.Berkeley Labs,CC BY
Similarly, we found solar can do well in less cloudy events, like wildfire prevention shutoffs in California, or after the 2020 derecho windstorm in Iowa.
The heat source in a home is also a key factor. In a five-to-10-day outage following an ice storm in Oklahoma in 2020, we found that solar plus a 30-kWh battery could have supplied nearly all the critical power and heat needed for homes with natural gas heaters or heat pumps. But homes with electric resistance heating would have fallen short.
In Texas, over half of the homes areheated with electricity, primarily resistance heaters. Energy Star-rated heat pumps – which provide both heating and cooling – usehalf as much electricityper unit of heat output as electric resistance heaters and are also more efficient at cooling than the average new air conditioner. Converting older resistance heaters to new heat pumps can not only save money and reduce peak demand but also increase resilience during outages.
New forms of backup
Setting up solar and storage to provide backup power in a home or building takes extra work and it costs more – just one Powerwall can runfrom US$12,000 to $16,500for a full system installation, before incentives and taxes. That’s as much as a fair-sized solar system. Nevertheless, a growing number of homeowners are installing both.
Over 90%of new solar installations in Hawaii in 2021 were paired with batteries after a regulation change. Now, these distributed power plants arehelping power the gridas coal plants are retired.
California hasover 1.5 millionrooftop solar systems. A growing number of customers are retrofitting batteries on their systems, or adding new solar plus storage, in part because utilities have resorted to “public safety power shutoffs” to lower the risk of wildfires sparked by power lines during dry, windy days.
Electric trucks and cars have much more battery storage than a Powerwall and hold potential as future home batteries as well.Ford
And new forms of backup power are emerging, especially from electric cars. Ford is partnering with SunRun to combine its new F150 Lightning electric pickup truck with solar and a two-way charger that canuse the truck’s batteryto power a house. The standard version of the truck comes with a 98-kWh battery, the equivalent of more than seven Tesla Powerwall stationary batteries.
Critical power for critical services
A fire station in Puerto Rico offers a glimpse of what solar and storage can do. After Hurricane Mariacut power for monthsin 2017, over 40,000 solar systems were installed on the island, often paired with battery storage. One of those is at the fire station in the town of Guánica, which had been unable to receive emergency calls in previous outages.
When Hurricane Fiona’s wind and flooding again knocked out power to most of Puerto Rico in September 2022, the fire station was still operating.
“The solar system isworking beautifully!” Sgt. Luis Saez told Canary Media the day after Fiona knocked out power. “We did not lose power all throughout the hurricane.”
Off the grid living is becoming more and more popular, and with it comes an increasing need for portable energy. Vancouver’s own Royer Batteries has created the smallest and lightest Lithium battery – The Micro Smart Heated Battery – that North America has seen, that’s the perfect solution to energy needs, whether for solar off-grid homes, RVs, van-life, or marine usage. Coming with many new advantages in comparison to its old alternative, the lead acid battery, the Canadian assembled Micro Battery uses LiFePO4 chemistry and trumps it in every category while setting the stage for the future for how we store electricity.
The lead acid battery has been the traditional choice for off-grid power usage for many years, but throughout it, the battery has had faults that leave users with more stress over their electricity. Though there are different types of lead acid batteries with different strengths, the weaknesses of them all remain the same. Firstly, the lead acid battery can only use 50% (or less) of it’s rated capacity (Ah) for each cycle, leaving less usable power than advertised. For lead acid battery users this means you don’t really get what you think, energy wise – you get half of it. Furthermore, if the lead acid battery isn’t charged on a strict schedule, the lack thereof will begin to damage the battery, before it’s even used all of its power.
Cycle life – the number of times a battery can be recharged – is another issue that could be improved when it comes to lead acid batteries. At about 1500 cycles, the lead acid battery will have lost 50% capacity. Though this may still seem like a lot of cycles, it’s important to note that how much usable KWh – Kilowatt-Hour – the battery can deliver is still being reduced each cycle, meaning even before the 50% capacity loss, the lead acid battery will not be able to deliver the same amount of power even halfway into its life cycle. Overall, weighing around 4-6x times more than lithium batteries, the lead acid battery is delivering sub-optimal power, low energy density, and high maintenance needs, without even delivering longevity.
With the Micro Battery, you are truly getting what you pay for. With 100% usable capacity or depth of discharge, it overcomes the deficits of the lead acid battery, and in turn revolutionized the way off grid power is stored. The battery does not need to be constantly recharged to maintain it’s life expectancy, nor does it have the same life cycle shortage as its alternative. In comparison to the lead acid battery which loses 50% capacity over 1500 cycles, the Micro Battery comes out on top, losing only 20% capacity over a minimum of 3000 cycles, and up to 5000 in most applications. It also doesn’t lose as much capacity every cycle, ensuring you are getting the optimal amount of electricity out of your battery, every time. Over the life-time, the Micro Battery will output over 10 times the amount of usable power, greatly increasing the amount of energy a user can get out of their battery. Although it cannot be charged in 0 degrees and below, nor discharged in -20 degrees and below, the Micro Battery was designed with a low consumption automatic built-in heater, to face its weaknesses head on.
The Micro Battery not only fixes the faults of its alternative but comes with new upgrades, as well. It comes with an app that connects to the battery with Bluetooth, enabling users to not only see if there are issues with their battery, but also better understand their energy usage. This app allows users to be more energy conscious, in addition to understanding how their battery really works. Furthermore, Each battery comes with a 10 year warranty but it can easily last you up to 25 years with relevant energy density still left. The Micro Battery is completely serviceable so parts are interchangeable and exchangeable; if there is an issue out of warranty it can be repaired simply.
This battery is likely going to take the market by storm. Even with other lithium-based batteries on the market, those batteries tend to have lower kWh, up to 50% larger, up to 50% heavier, as well as have less features. With the Micro Battery, the cells are square, optimizing space. Meanwhile, weighing in at only 59 pounds, the Micro 12V 310Ah Battery is the perfect solution for mobile applications, such as van-living. Although this battery costs on average 2 times more than its lead acid alternative, over the life-time of the LiFePO4 it will cost 5 times less money per Amp-hour used.
The Micro battery will truly revolutionize the way off-grid power is used and stored. Tyrone Royer, creator of the Micro Battery from Royer Batteries, reports on how he feels about his battery and its size, saying “I just love hearing ‘No way, you can’t fit that much power in there!’” At 59 pounds 100% capacity that can be cycled up to 10000 times in its lifetime, the Micro is the best new way to store energy.
The angle at which a solar panel faces the sun determines how much energy it will receive.
The sun provides a huge amount of energy as its rays touch the Earth’s surface. But the quantity of energy that you can harness is another matter. The efficiency of solar cells, their arrangement, and the amount of sunlight they receive all affect their output. Before deciding whether solar panels are a good choice to save you money, determine if you can fully power your home with solar panel electricity.
Step 1
Determine your solar panels’ efficiency rate. The amount of energy that can be taken in and converted into electrical energy per solar panel is its efficiency. For photovoltaic solar cells, efficiency can reach about 19 percent. But for concentrated photovoltaic cell panels or CPV panels, the efficiency can exceed 40 percent. Whether you are creating your own panels or purchasing pre-made panels, determine the efficiency per cell of the panels you plan to install. Keep in mind when choosing what type of panels to use that CPV panels usually require more work to set up, and more land, as they are designed to concentrate sunlight on a specific panel.
Step 2
Size the area for your solar panels. Determine how many panels can fit on your designated area while taking into account the terrain, local construction laws, and other spacing issues. Solar panels come in several types and dimensions but, as an example, 100-200W solar panels usually measure 1 square meter in size.
Step 3
Calculate the energy per acre. On average, 1 square meter of solar panels directly exposed to sunlight will receive about 1-kilowatt hour (kW/h) of energy per hour for the six hours it is exposed to effective sunlight, or 6-kilowatt hours of solar energy a day. One acre is approximately 4,046 square meters, so if you have an acre’s worth of solar cells, then you will receive about 4,046 kilowatt hours of electricity each hour, or 24,276-kilowatt hours a day.
Step 4
Multiply the energy you receive by the efficiency of your solar panels to discover how much usable electricity you can yield. If your solar panels are 19 percent efficient and you receive 24,276 kilowatt hours a day of solar energy, then you will receive about 4,612-kilowatt hours of usable electricity through solar energy.
Step 5
Subtract your maximum potential energy needs from the amount of energy being produced. You can find out how much energy you use by looking at a past electric bill or calling up the company that services your electricity directly. But for a general idea, the average American family uses about 920-kilowatt hours of electricity per month. So if you produced approximately 4,612-kilowatt hours of usable electricity per day, you would produce enough energy in a day to run four average households for a month.
Photovoltaic cells are the main ingredient of all photovoltaic solar energy systems, turning sunlight directly into electricity. Since the first silicon photovoltaic cells were discovered in the 1950s, technological developments have improved performance and transformed solar energy capabilities. An increasingly viable and popular renewable energy source, grid-connected photovoltaic systems grabbed a 75 percent share of U.S. installations in 2009, up from 31 percent in 2001.
Grid Connected Basic Facts
General household electrical systems and appliances need alternating current power.
Being grid-connected means that a solar photovoltaic system is linked directly to the available electrical grid or utility lines. A connected system comprises a photovoltaic panel or set of panels that directly convert sunlight into electricity. The size of the system dictates how independent from the grid it’s possible to be. Grid-connected systems need inverters to convert direct current into alternating current usable electricity. The inverter connects to the main electrical supply with a meter showing the number of generated kilowatt hours. Excess electricity can be sold back to the grid.
Constant Reliable Power
Grid-connected photovoltaic systems guarantee a home always has access to power, even if the solar energy fails or is insufficient. The system’s inverter connects to a battery bank that can store energy to be used in a power failure. An advantage of grid-connected systems is that they are not dependent on the sun shining. Off-grid photovoltaic energy is only intermittent but grid-connected systems ensure that any additional electricity needed is automatically delivered by the grid.
Financial Benefits Of Grid Connected Systems
More than 35 states now have “net metering” legislation, meaning that householders benefit from selling excess energy back to the grid at normal retail prices. The Department of Energy notes that this puts people in Hawaii and New York at a great advantage because of the high retail electric rates. State and federal incentives include sales tax exemptions on the systems themselves, property tax exemptions, and personal state income tax credits.
As well to lower energy bills, grid-connected solar systems can add overall value to properties too. A federal study of California homes revealed that a 3,100-kilowatt hour system increases the home’s value by an average of $17,000.
Disadvantages Of Being Grid Connected
Installing solar systems near existing utility power lines means that photovoltaic generated electricity costs more than that supplied by conventional methods. At its cheapest, solar energy is estimated to be 25 cents per kilowatt hour — generally between double and quadruple the cost of utility-supplied electricity. Initial costs are high so in practice installing a grid-connected solar system is like paying your electricity bill up front, years in advance.
The permits and legal requirements for installing grid-connected systems can be costly, complex, and time-consuming. While national standards are beginning to be adopted, many regional agencies have different legislative procedures so the best starting point is the local city or county building department.
The standard formula for rating solar panels looks at the amount of power the unit produces in full sunlight at 77 degrees Fahrenheit. However, many homeowners in northern latitudes might only reach that optimal standard for solar collection a few days per year. Suppose you live in an area where sunlight is weakened by such factors as inclement weather and the earth’s tilt, yet wish to take as full advantage of solar power as possible. In that case, you need solar panels that are optimized for better efficiency under substandard conditions.
Monocrystalline Panels
Of the three basic solar panel types–monocrystalline, polycrystalline and amorphous–monocrystalline is the most efficient in collecting solar energy and therefore somewhat more effective in regions with low sunlight. As the name suggests, they are made from a single large silicon crystal cut from an ingot. Polycrystalline panels use many small crystals to form the collection surface, while amorphous, or thin film, solar panels consist of silicon particles applied to the surface of large plates. Monocrystalline panels, while more efficient, are only slightly so. They are also the most expensive of the three types.
Hybrid Panels
Some manufacturers, including industry leader Sanyo technologies, have combined monocrystalline and amorphous thin film to produce a hybrid panel that Sanyo has dubbed Heterojunction with an Intrinsic Thin Layer (HIT). According to Sanyo’s marketing literature, these hybrid panels “boast high conversion efficiency ranging from 15.3 to 16.4, excellent temperature characteristics, and considerable output under diffuse and low light conditions.” Sanyo’s 190-watt photovoltaic (PV) module has earned a 17.4 percent efficiency rating, well above the industry average of 12 percent.
High-Powered Panels
Industry experts consider solar panels with a collection capacity of greater than 100 watts to be high-powered. The wattage of a panel describes the amount of power the panel can produce in full sunlight at 77 F. The selection of high-powered panels compatible with the typical household 12-volt system dwindles as the wattage soars upward because the highest powered panels are designed for grid-tie systems rather than stand-alone systems, which deposit the power in a battery storage bank. You must also keep in mind that two panels with lower wattage will add up to the same collection capacity and be less expensive. In the case of solar panels, bigger does not automatically equate to better.
More Options
The U.S. Department of Energy’s Efficiency & Renewable Energy Program (EERE), established to develop innovations in the solar panel field, is working to optimize solar collector efficiency. One example is an experiment using a MicroDish composed of a concentration of Spectrolab solar cells–ultra-high-efficiency cells–in which EERE tested the use of mirrors designed to multiply the sun’s power. This application is intended “to substantially increase the viability of PV for cost-competitive applications.”
The LiFePO4 battery began with John B. Goodenough and Arumugam Manthiram. They were the first to discover the materials employed in lithium-ion batteries. Anode materials are not very suitable for use in lithium-ion batteries. This is because they’re prone to early short-circuiting.
Scientists discovered that cathode materials are better alternatives for lithium-ion batteries. And this is very clear in the LiFePO4 battery variants. Fast-forward, increasing stability, conductivity – improving all sorts of things, and poof! LiFePO4 batteries are born.
Today, there are rechargeable LiFePO4 batteries everywhere. These batteries have many useful applications – they’re used in boats, solar systems, vehicles, and more. LiFePO4 batteries are cobalt-free and cost less than most of its alternatives (over time). It’s not toxic and it lasts longer. But we’ll get to that more soon. The future holds very bright prospects for the LiFePO4 battery.
But what makes the LiFePO4 battery better?
LiFePO4 vs. Lithium Ion Batteries
Now that we know what LiFePO4 batteries are, let’s discuss what makes LiFePO4 better than lithium-ion and other lithium batteries.
The LiFePO4 battery isn’t great for wearable devices like watches. Because they have a lower energy density compared to other lithium-ion batteries. That said, for things like solar energy systems, RVs, golf carts, bass boats, and electric motorcycles, it’s the best by far. Why?
Well, for one, the cycle life of a LiFePO4 battery is over 4x that of other lithium-ion batteries.
It’s also the safest lithium battery type on the market, safer than lithium-ion and other battery types.
And last but not least, LiFePO4 batteries can not only reach 3,000-5,000 cycles or more… They can reach 100% depth of discharge (DOD). Why does that matter? Because that means, with LiFePO4 (unlike other batteries) you don’t have to worry about over-discharging your battery. Also, you can use it for a longer period of time as a result. In fact, you can use a quality LiFePO4 battery for many years longer than other battery types. It’s rated to last about 5,000 cycles. That’s roughly 10 years. So the average cost over time is much better. That’s how LiFePO4 batteries stack up vs lithium-ion.
Here’s why LiFePO4 batteries are better than not just lithium-ion, but other battery types in general:
Safe, Stable Chemistry
Lithium battery safety is important. The newsworthy “exploding” lithium-ion laptop batteries have made that clear. One of the most important advantages LiFePO4 has over other battery types is safety. LiFePO4 is the safest lithium battery type. It’s the safest of any type, actually.
Overall, LifePO4 batteries have the safest lithium chemistry. Why? Because lithium iron phosphate has better thermal and structural stability. This is something lead acid and most other battery types don’t have at the level LiFePO4 does. LiFePO4 is incombustible. It can withstand high temperatures without decomposing. It’s not prone to thermal runaway and will keep cool at room temperature.
If you subject a LiFePO4 battery to harsh temperatures or hazardous events (like short-circuiting or a crash) it won’t start a fire or explode. For those who use deep cycle LiFePO4 batteries every day in an RV, bass boat, scooter, or liftgate, this fact is comforting.
Environmental Safety
LiFePO4 batteries are already a boon to our planet because they’re rechargeable. But their eco-friendliness doesn’t stop there. Unlike lead acid and nickel oxide lithium batteries, they are non-toxic and won’t leak. You can recycle them as well. But you won’t need to do that often, since they last 5000 cycles. That means you can recharge them (at least) 5,000 times. In comparison, lead acid batteries last only 300-400 cycles.
Excellent Efficiency and Performance
You want a safe, non-toxic battery. But you also want a battery that’s going to perform well. These stats prove that LiFePO4 delivers all that and more:
Charge efficiency: a LiFePO4 battery will reach full charge in 2 hours or less.
Self-discharge rate when not in use: Only 2% per month. (Compared to 30% for lead acid batteries).
Runtime is higher than lead acid batteries/other lithium batteries.
Consistent power: the same amount of amperage even when below 50% battery life.
No maintenance is needed.
Small and Lightweight
Many factors weigh in to make LiFePO4 batteries better. Speaking of weighing–they are total lightweights. In fact, they’re almost 50% lighter than lithium manganese oxide batteries. They weigh up to 70% lighter than lead acid batteries.
When you use your LiFePO4 battery in a vehicle, this translates to less gas usage and more maneuverability. They are also compact, freeing up space on your scooter, boat, RV, or industrial application.
LiFePO4 Batteries vs. Non-Lithium Batteries
When it comes to LiFePO4 vs lithium ion, LiFePO4 is the clear winner. But how do LiFePO4 batteries compare to other rechargeable batteries on the market today?
Lead Acid Batteries
Lead acid batteries may be a bargain at first, but they’ll end up costing you more in the long run. That’s because they need constant maintenance, and you must replace them more often. A LiFePO4 battery will last 2-4x longer, with zero upkeep needed.
Gel Batteries
Like LiFePO4 batteries, gel batteries don’t need frequent recharging. They also won’t lose charge while stored. Where do gel and LiFePO4 differ? A big factor is the charging process. Gel batteries charge at a snail’s pace. Also, you must disconnect them when 100% charged to avoid ruining them.
AGM Batteries
AGM batteries will do plenty of damage to your wallet, and are at high risk of becoming damaged themselves if you drain them past 50% capacity. Maintaining them can be difficult as well. LiFePO4 Ionic lithium batteries can be discharged completely with no risk of damage.
A LiFePO4 Battery for Every Application
LiFePO4 technology has proven beneficial for a wide variety of applications. Here are a few of them:
Fishing boats and kayaks: Less charging time and longer runtime mean more time out on the water. Less weight allows for easy maneuvering and a speed boost during that high-stakes fishing competition.
Mopeds and mobility scooters: No dead weight to slow you down. Charge to less than full capacity for impromptu trips without damaging your battery.
Solar setups: Haul lightweight LiFePO4 batteries wherever life takes you (even if it’s up a mountain and far from the grid) and harness the power of the sun.
Commercial use: These batteries are the safest, toughest lithium batteries out there. So they’re great for industrial applications like floor machines, liftgates, and more.
Much more: In addition, lithium iron phosphate batteries power many other things. For example – flashlights, electronic cigarettes, radio equipment, emergency lighting and much more.
LiFePO4 Quick Answers
Is LiFePO4 the same as lithium-ion?
Not at all! The LiFePO4 battery has a cycle life of over 4x that of lithium-ion polymer batteries.
Are LiFePO4 batteries good?
Well, for starters, LiFePO4 batteries are incredibly efficient compared to traditional batteries. Not only that, they’re super-light and you can use most of your battery’s capacity without any problems. (You can only use roughly 50% with lead acid batteries. After that, the battery gets damaged.) So overall, yes, very much so – LiFePO4 batteries are great.
Can LiFePO4 catch fire?
LiFePO4 batteries are the safest of lithium batteries, because they will not catch fire, and won’t even overheat. Even if you puncture the battery it will not catch fire. This is a massive upgrade over other lithium batteries, which can overheat and catch fire.
Is LiFePO4 better than lithium-ion?
The LiFePO4 battery has the edge over lithium-ion, both in terms of cycle life (it lasts 4-5x longer), and safety. This is a key advantage because lithium-ion batteries can overheat and even catch fire, while LiFePO4 does not.
Why is LiFePO4 so expensive?
LiFePO4 batteries are usually more expensive on the front end, but cheaper long-term because they last so long. They cost more upfront because the materials used to build them are more expensive. But people still choose them over other batteries. Why? Because LiFePO4 has many advantages over other batteries. For example, they’re much lighter than lead acid and many other battery types. They’re also much safer, they last longer, and require no maintenance.
Is LiFePO4 a lipo?
No. Lifepo4 has a number of distinct advantages over Lipo, and while both are lithium chemistries, they are not the same.
What can I use LiFePO4 Batteries for?
You can use LiFePO4 batteries for the same things you’d use lead acid, AGM or other traditional batteries for. For example, you can use them to power bass boats and other marine toys. Or RVs. Or solar setups, mobility scooters, and much more.
Is LiFePO4 more dangerous than AGM or lead acid?
Nope. It’s actually quite a bit safer. And for a number of reasons, including the fact that LiFePO4 batteries don’t leak toxic fumes. And they don’t spill sulfuric acid like many other batteries (like lead acid.) And like we mentioned earlier, they don’t overheat or catch fire.
Can I leave my LiFePO4 battery on the charger?
If your LiFePO4 batteries have a battery management system, it will prevent your battery from overcharging. Our Ionic batteries all have built-in battery management systems.
What is the life expectancy of LiFePO4 batteries?
Life expectancy is one of the biggest perks, if not the biggest perk of LiFePO4. Our lithium batteries are rated to last around 5,000 cycles. That is 10 years or so (and often more), depending on usage of course. Even after those 5,000 cycles, our LiFePO4 batteries can still function at 70% capacity. And better still, you can discharge past 80% without a single issue. (Lead acid batteries tend to gas out when discharged past 50%.)
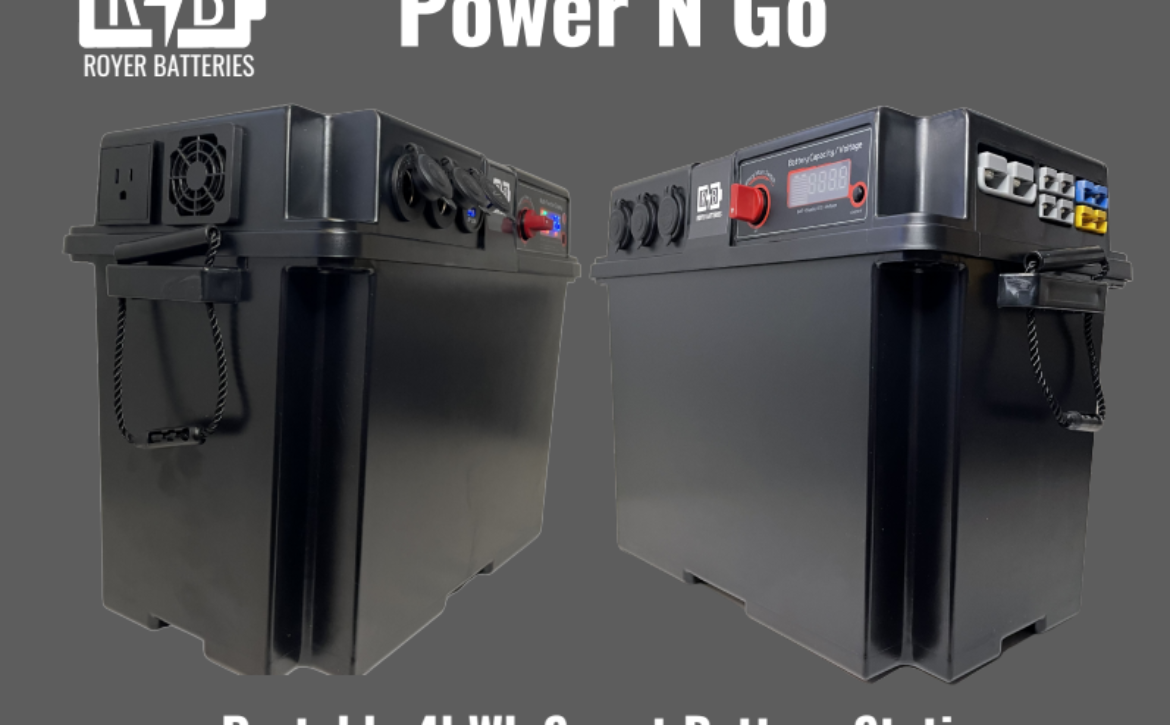
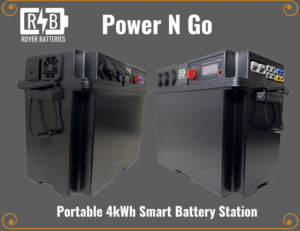
Power everywhere. Much more than just a battery and it is built in Canada. Complete customization, Portability, power, and convenience come together in this versatile power station. Optional 1000W pure sine wave inverter and MPPT/DC2DC charge controller make the Power N Go unmatched. Our smart Bluetooth BMS lets you know what’s going on at all times which comes standard with all units. LiFePO4 is some of the longest-lasting and safest lithium chemistries.
Features
The power station has a long list of features including an optional built-in 1000W (2000W peak) pure sine wave inverter to power all your AC devices on the go. Another option is the all-in-one 300W MPPT charge controller and 30A DC2DC converter and isolator. To plugin there is 1x SMH175 & 4x SMH50 Anderson connectors, 2x 12V automotive ports, 2x 2.1A USB. A hard cut-off switch and battery state indicator are built-in for quick disconnection and convenience.
Capacity
Using four of our high capacity 3.2V 310Ah prismatic cells translates into more reliability; fewer parts, fewer issues. Our cells are designed to use the full depth of discharge giving maximum capacity when required. You always have the option (through Bluetooth) to change the charging and discharging parameters to a 20%-90% cycle to extend the lifetime of the battery. Compared to lead-acid, lithium offers more than 2x more power per rated Ah as well as consistent voltage.
Cycle Life
If you use a full cycle daily, it will be 8-13.5 years until you realize a 20% capacity loss. This means with the 310Ah, after 3000 – 5000 cycles you would still have up to 248Ah of usable power. The battery can easily have a useful life of more than 10,000 cycles/25 years in most applications. This is the only battery you will need, which is why we include our 10-year warranty but do expect it to run much longer.
Smart BMS
Lithium batteries require a battery management system (BMS) to ensure proper voltage and temperature cut-offs. Separating our batteries with our smart Bluetooth BMS, you can set parameters of charging and discharging, monitor real-time usage, see available power left, and turn on and off all from your phone. At any time, you will know how much power you’re discharging or charging and how much you have left. The BMS has automatic high/low temp and voltage cut-offs to maximize your battery life. We use quality JBD BMS for our Power N Go power stations.
Temperature
LiFePO4 chemistry cannot be charged at 0 °C or discharged at -20 °C which is why our BMS disable these functions when low temperatures are detected. Depending on your battery location and climate, you may require your battery to work in colder weather. Our batteries can come with built-in automatic heating. The optional heater can keep the battery temperature above 0 °C to allow all functions to work in any weather. The heater uses very little power to keep everything warm.
Amp Rates
Our smart BMS is rated to output 150A continuous with a 300a peak (3 seconds) and charging up to 150A continuously. By paralleling units, you can multiply amperage rates by number of paralleled batteries. Please gauge your wiring accordingly to account for your expected loads.
Safety
The most important thing to all our batteries is safety. LiFePO4 is one of the safest lithium chemistries and will not catch on fire like other li-ion batteries. There is no venting or required maintenance with these batteries. Storage losses are under 3% per month so you can leave the battery dormant for long periods without issues.
Parallel/Series
Our Power N Go is capable of up to 4 series and 4 paralleled batteries. With series connections, the inverter or MPPT/DC2DC cannot be built in. If you require a specific voltage and Ah, please see ourKing-Pawnbattery system for a single BMS option for multiple batteries. We also offer a more basic 4kWh option with terminals called theTiny 12V. If you require more capacity, voltage, or anything else please contact us directly as we can do anything!