The first tranche of funding ($2.6B) for the Canadian Greener Homes Grant was fully subscribed in early 2024. Applicants that received their APA numbers are still eligible to complete their retrofits and claim the grant, but the program is closed for new applicants.
Canada Greener Homes Affordability Program (NRCan):
$800 million over five years, starting in 2025-26, to launch a new Canada Greener Homes Affordability Program that will support the direct installation of energy efficiency retrofits for Canadian households with low- to median-incomes. Thebudgetis clear that this additional $800m is for new NRCan grant funding and is to work with the existing Greener Homes Loan program, but it is now clear that there will be no new grant applications possible in 2024. This information is found on page 79 of the budget.
Greener Homes Loan (CMHC):
The existing 0% interest, 10yr amortization loan of up to $40,000 is still in place with no change to the application process including pre- and post-audits. Charge Solar believes that, at the current usage rate, there is sufficient remaining funds for new loan applications through to at least the end of 2024. We will update our customers as we learn more. Loan websitehere.
Investment Tax Credits
Clean Technology ITC:
The Clean Technology ITC provides a 20-30% refundable tax credit for Canadian businesses to invest in clean technologies such as solar and battery storage. While the eligibility window started in March 2023, the legislation is still working its way through Parliament asBill C-59. The budget indicates on page 182 that “With the support and collaboration of Parliamentarians, the government anticipates Bill C-59 receiving Royal Assent before June 1, 2024.” Further information on the Clean Technology ITC is available on our most recent webinarhere.
Clean Electricity ITC:
The Clean Electricity ITC provides a 10-15% refundable tax credit to certain taxable and non-taxable corporations, including corporations owned by municipalities or Indigenous communities, and pension investment corporations who invest in clean electricity generating assets such as solar and battery storage. The eligibility period started on budget day (April 16, 2024) for projects that did not begin construction before March 28, 2023. Enabling legislation for this ITC is expected to be introduced later in 2024.
Welcome to the Future of Solar Energy with Power My Home and Energy Economics!
If you’ve been exploring new solar panels, you’re in the right place. In our pursuit of staying ahead in the game and ensuring a lifetime assurance for your purchases, we are thrilled to introduce you to our latest innovation: the Bifacial Solar Panel. As we step into the new year of 2024, let’s embark on a journey to discover the incredible potential and advantages of these cutting-edge solar panels brought to you by Power My Home and Energy Economics.
Unlocking the Power of Bifacial Solar Panels:
So, what sets apart the Bifacial Solar Panel? It’s simple—they capture sunlight from both sides, doubling their efficiency and impact. Today, let’s delve into the intricacies of these panels, exploring their effectiveness, advantages, costs, installation tips, and more.
Understanding Bifacial Solar Panels:
A Bifacial solar panel is designed with photovoltaic cells that capture sunlight from both the front and back sides, utilizing reflected light from the ground or other surfaces. Unlike traditional monofacial solar panels, which capture sunlight from only one side, Bifacial Solar Panels can achieve an efficiency boost of up to 30%. This unique feature allows them to harness additional solar energy, especially in environments with reflective surfaces like snow, water, or light-colored terrain.
Harvesting Reflected Light:
Sunlight contains the power of reflection off various substances and surfaces, including ground surfaces. Bifacial cells capture this reflected light, a phenomenon referred to as “Albedo.” This makes Bifacial Solar Panels particularly effective in environments with reflective surfaces, enhancing their efficiency in capturing sunlight.
Types of Bifacial Solar Panels:
Glass-Glass: Exceptional strength and resistance to heavy loads.
Glass-Transparent Back sheet: Efficient bifacial operation with a more cost-effective approach.
Glass-Back sheet: A good balance between efficiency and affordability.
Advantages of Bifacial Solar Panels:
Generate 30% more power with dual-sided efficiency.
Ideal for ground installations, outperforming rooftop installations.
Durability in harsh weather conditions, especially double glass panels.
Cost-effective when used in tracking systems, cutting costs by up to 16%.
Versatile for various installations, including glass-covered structures.
Disadvantages of Bifacial Solar Panels:
Higher initial costs due to increased manufacturing materials.
Not suitable for shaded or non-reflective areas.
Heavier than regular panels, complicating handling and adjustment.
Installation Considerations:
Ground-mounting: Ideal for maximizing reflection from various surfaces.
Roof-tops mounting: Less efficient on rooftops due to shading limitations.
Floating: Suitable for water surfaces, enhancing overall energy generation.
Expenses of Installing Bifacial Solar Panels:
While Bifacial Solar Panels come with a slightly higher price tag compared to monofacial panels, their enhanced energy production often balances out the additional upfront cost. Generally, expect a bifacial panel to be priced approximately 10 to 20 cents per watt more than its monofacial counterpart.
Cell Structures of Bifacial Solar Panels:
Several cell structures, including PERT, PERL, PERC, IBC, and HIT, offer varying efficiencies and bifacial capabilities. Choose the one that best suits your energy needs.
Effectiveness for Rooftops:
Bifacial Solar Panels are less efficient on rooftops due to shading limitations. Optimal functionality requires substantial space to prevent shading and facilitate effective absorption of reflected light.
Mounting Procedures:
Ground-mounting: Offers versatility for capturing light from various angles.
Roof-tops mounting: Requires fine-tuning of positioning and tilt for optimal absorption.
Floating: Suitable for water surfaces, enhancing overall energy generation.
Installation Tips:
Organize spaces under bifacial panels to minimize shadowing.
Maintain a minimum height of 101cm above the ground, as per IEEE recommendations.
Ensure the strength of mounting systems for proper support.
Opt for vertical alignment to reduce back panel blockage and aid in snow removal.
Consult a solar expert for the best bifacial panel height.
As we step into 2024, let’s embrace the future of solar energy with Power My Home and Energy Economics’ Bifacial Solar Panels. Double the power, double the impact—because a brighter, sustainable future starts with innovation.
Light up your world with Power My Home and Energy Economics! Visit www.powermyhome.ca
For a brief period over several weekends this spring, the state of South Australia, which has a population of 1.8 million, did something no other place of similar size can claim: generate enough energy from solar panels on the roofs of houses tomeet virtually all its electricity needs.
This is a new phenomenon, but it has been coming for a while – since solar photovoltaic cells started to be installed at a rapid pace across Australia in the early 2010s. Roughly one in three Australian households,more than 3.6m homes, now generate electricity domestically. In South Australia, the most advanced state for rooftop solar, the proportion is nearly 50%.
No other country comes close to installing small solar systems on a per capita basis. “It’s absolutely extraordinary by world standards,” said Dr Dylan McConnell, an energy systems analyst at the University of New South Wales. “We’re streets ahead.”
There was no overarching plan that made Australia the world leader in household solar PV. Analysts mostly agreed that it was a happy accident, the result of a range of uncoordinated policies across tiers of government. Many were subsidy schemes that were derided as too generous and gradually scaled back, but the most important – an easy-to-access, upfront national rebate available to everyone – endured. It has helped make panels cost-effective and easy to install.
Cost was a big consideration for the Jamiesons – Sean, Deb, and their 19-year-old daughter, Molly – when they installed a system on the four-bedroom house in a beachside suburb in South Australia’s capital, Adelaide, a decade ago. They upgraded to a larger 8kW system during a home renovation five years later, and have installed two batteries, the first subsidized as part of a state government scheme trialing household energy storage systems to help stabilize a power grid that increasingly runs on variable solar and wind power.
Sean Jamieson, a pilot with the airline Jetstar, said the setup had been “incredibly beneficial”, in part because his family uses a range of energy-hungry equipment, including a pool and hot tub. They first opted for solar after watching the price of grid electricity rise sharply, mainly due to the cost of rebuilding electricity transmission poles and wires. He said it has continued to make sense.
“I’m looking at paying it off [through savings on what annual power bills would otherwise have been] in three or four years, so it’s been a great investment,” he said of the household energy system. “Generally, solar is just a no-brainer in South Australia. We’ve got a lot of sunshine and the most expensive electricity in Australia, and in the beginning, it was heavily subsidized.”
Dr Gabrielle Kuiper, an independent energy and climate change strategist, noted Australia was not the first country out of the gate on rooftop solar – that was Germany, which introduced the first subsidy scheme, and “none of us would be here without them” – but said it was one of the first to capitalize on the German model. It began with a natural advantage: more sun than nearly any other wealthy country. Even the southern island state of Tasmania is at a latitude that would place it level with Spain and California if it were in the northern hemisphere.
Kuiper said Australia had succeeded at solar for reasons beyond geography. Incentives were a big part of it, but the technology’s rise was accelerated by ordinary people embracing it to have some control over their power bills and, in some cases, play a small part in tackling the climate crisis by reducing the country’s reliance on coal.
The subsidies initially included a national rebate of A$8,000 for a small 1kW array – more than the sticker price in parts of the country. It was complemented by state government feed-in tariff schemes that paid households for the energy they fed back into the power grid and, in some cases, for all the electricity they generated.
There was little planning in how the various incentives fit together and critics attacked it as an expensive and inefficient way to cut greenhouse gas emissions. But it kickstarted an industry of installers, sales people, trainers and inspectors, and quickly made solar a viable option for people beyond the country’s wealthiest suburbs.
Today, the feed-in-tariffs have been cut, but thenational rebate scheme survives, with bipartisan support despitedeep divisions over other responses to the climate crisis. Analysts and industry players have praised its elegant design. The rebate is processed by and paid to the installer. The buyer may not even know it exists. It is reduced by about 8% each year, a rate that roughly keeps pace with the continuing fall in the cost of having panels installed.
The fall in cost has been significant. The sums vary depending on geography, but the SolarQuotes comparison site suggests many Australians can get a 6kW solar systemfor about A$6,000(£3,100). The panels are likely to have paid for themselves within five years.
The influx of solar has brought challenges, including how to manage the flood of near-free energy in the middle of the day that risks making inflexible coal generators unviable before the country is ready for them to be turned off. Some states have responded by curtailing how much can be accepted into the grid, but Kuiper says this can be addressed through increasingly creative management. Answers include improving incentives for household batteries and fostering a two-way energy exchange between the grid and a growing electric vehicle fleet.
Simon Holmes à Court, a longtime clean energy advocate and convener of the political fundraising body Climate 200, said it was clear rooftop solar was playing a bigger part in reaching that than many people expected. “Not long ago renewables skeptics laughed at rooftop solar’s ‘tiny’ contribution. These days there’s no question solar is playing a major role in pushing coal out of our grid,” he said.
Tristan Edis, an analyst with the consultants GreenEnergyMarkets, said the lesson for those watching on was pretty simple: the generous early subsidies worked. “It really was this fortuitous accident that happened,” he said. “The message from it is pretty clear: go hard and go big, or don’t bother.”
The clock is ticking, and the opportunity to transform your home into an eco-friendly haven with the Greener Grant Home is slipping away. 🕒 As of now, a staggering 65% of the funds allocated for this incredible federal government initiative have already been snapped up. 🌟
🌞 Imagine lower energy bills, reduced carbon footprint, and increased comfort within your home. The Greener Grant Home can make this vision a reality.
💡 Here’s why you should seize this opportunity NOW:
🌱 Unparalleled Savings: With up to 65% of the funds already allocated, there’s no time to waste. The Greener Grant Home offers substantial financial incentives to make your home more energy-efficient, from insulation upgrades to efficient heating systems.
💚 Environmental Impact: Every energy-efficient upgrade you make through the Greener Grant Home reduces your carbon footprint and contributes to Canada’s commitment to sustainability and a greener future for generations to come.
🏠 Enhanced Home Value: Say goodbye to chilly winters and sweltering summers. With the Greener Grant Home, you can enjoy year-round comfort in your home, and the installation of solar panels ensures your home value goes up, contributing to a sustainable and financially sound future.
💰 Long-Term Savings: Lower energy bills are a given when you make your home more energy-efficient. These savings continue to add up over the years, making your investment in a greener home a wise financial decision.
🤝 Don’t miss out on this golden opportunity to enhance your home’s energy efficiency while saving money and reducing your environmental impact. The clock is ticking, and funds are running out!
🚀 Act NOW and take the first step toward a Greener Home. Reach out to us for a FREE assessment or visit the official Greener Grant Home website to learn more and start your application process. Your future self and the planet will thank you! 🌎🌟
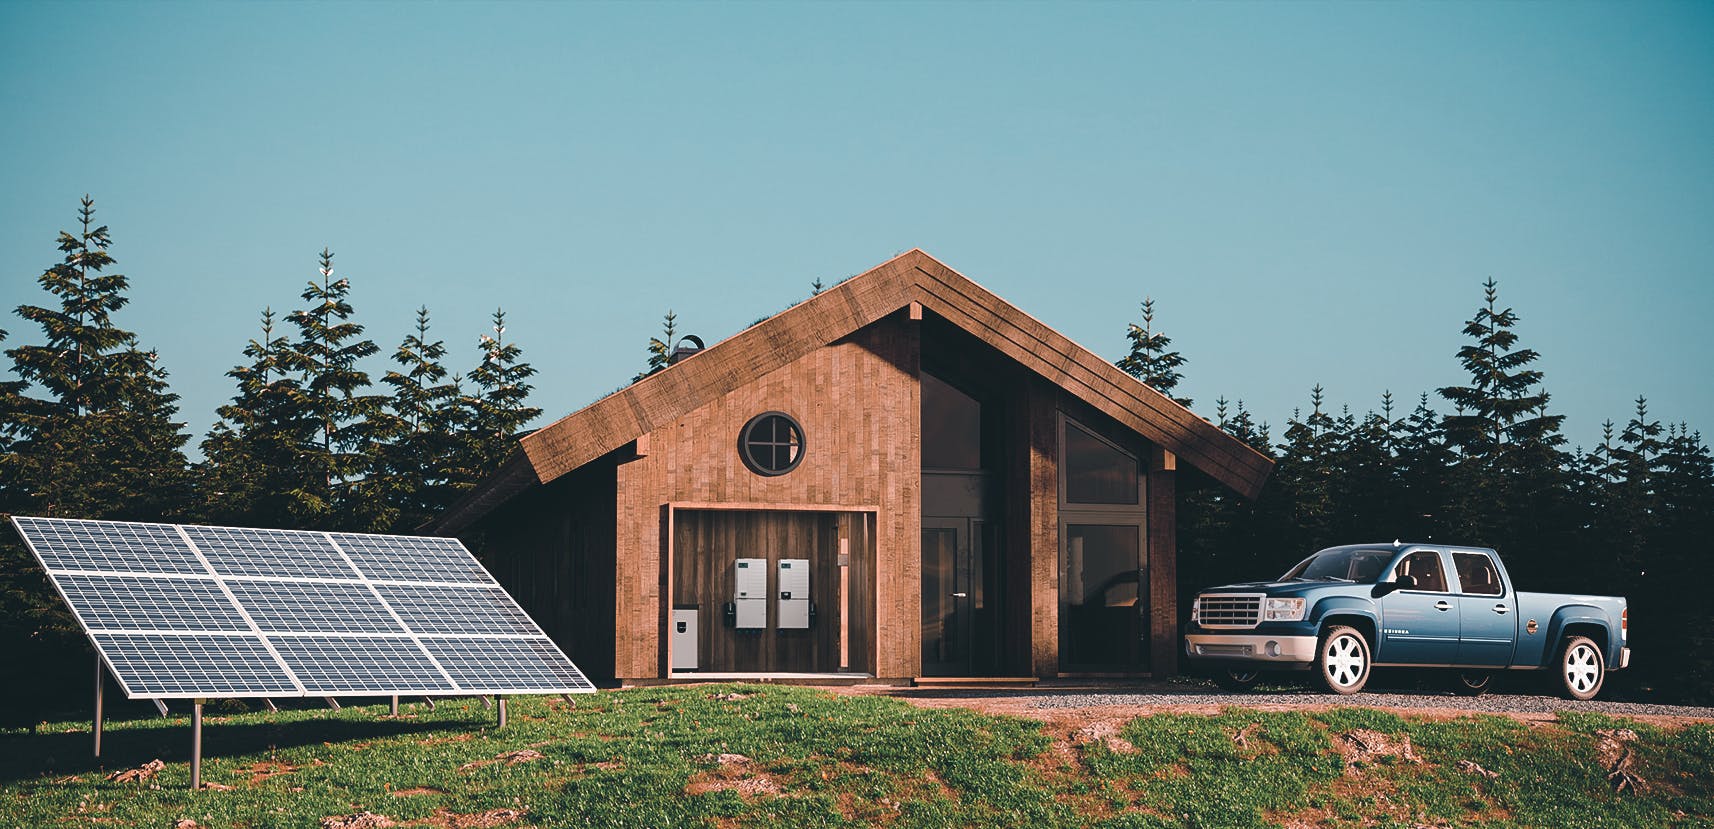
Off-grid living refers to the practice of living independently from the traditional power grid by generating one’s own electricity, water, and other necessities. This can be achieved through a variety of methods, such as solar power, wind power, hydropower, and even alternative energy solutions like biomass or geothermal.
One of the main benefits of off-grid living is the ability to be self-sufficient and not rely on the power grid or other public utilities. This can be especially appealing for those who live in remote or rural areas where access to the power grid is limited. Additionally, off-grid living can also be a more sustainable and environmentally-friendly lifestyle choice, as it reduces the dependence on fossil fuels and reduces the carbon footprint.
However, off-grid living also has its challenges. It can be costly to set up and maintain an off-grid system, and it requires a significant level of knowledge and expertise to install and maintain the system. Additionally, off-grid living often means living with limited resources and without the luxury of modern conveniences such as air conditioning, dishwashers, or other high-energy-consuming appliances.
In order to successfully live off-grid, it’s important to carefully plan and design the system. It’s also important to be aware of local regulations, as there may be legal restrictions or permit requirements for installing off-grid systems.
In conclusion, off-grid living is the practice of living independently from the traditional power grid by generating one’s own electricity, water, and other necessities. This can be achieved through a variety of methods such as solar power, wind power, hydropower, and alternative energy solutions. Living off-grid offers the benefits of self-sufficiency and sustainability but also comes with its own set of challenges like cost, maintenance, and limited resources. It is important to plan and design the system accordingly and be aware of local regulations.
Hurricane Ian’s catastrophic winds and flooding are likely to bring long-lasting power outages to large parts of Florida. The storm is the latest in a line of hurricanes and extreme heat and cold events that have knocked out power to millions of Americans in recent years for days at a time.
In many disasters- and outage-prone areas, people are starting to ask whether investing in rooftop solar and battery storage systems can keep the lights on and the air conditioner running when the power grid can’t.
When the grid goes down, most solar systems that lack a battery will also shut down. But with batteries, a home can disconnect from the grid. Each day, the sun powers the home and charges up the batteries, which provide power through the night.
Our team at Berkeley Lab explored what it would take for homes and commercial buildings to ride out long power outages, of three days or more, with solar and batteries.
How much can solar + storage do?
For a new report, we modeled a generic power outage for every county in the U.S., testing whether a rooftop solar system combined with a 10- or 30-kilowatt-hour battery could power critical loads, like refrigeration, lighting, internet service, and well pumps; if it could go further and also power heating and air conditioning; or if it could even power a whole home.
To put that into perspective, the most popular battery on the market, the Tesla Powerwall, has just over 13 kWh of storage.
In general, we found that even a modest system of solar plus one battery can power critical loads in a home for days at a time, practically anywhere in the country.
But our maps show that providing backup for cooling and heat can be a challenge, though not an insurmountable one. Homes in the Southeast and Pacific Northwest often have power-hogging electric resistance heaters, exceeding the capability of solar and storage during winter outages. Homes with efficient heat pumps performed better. Summer air conditioning load can be heavy in the Southwest, making it harder to meet all cooling needs with solar and storage in a summer blackout.
Larger solar and battery systems can help, but meeting demand during outages still depends on the weather, how energy efficient the home is, and other factors. For example, simple thermostat adjustments during power outages reduce heating and cooling needs and allow solar with storage to maintain backup power over longer periods.
The ability to power commercial buildings varies widely, depending on the building type. Schools and big-box retail stores, with sufficient roof space for solar relative to building power demand, fare much better than multistory, energy-intensive buildings like hospitals.
How solar would have handled 10 past disasters
We also looked at 10 real-world outage events from 2017 to 2020, including hurricanes, wildfires, and storms, and modeled building performance for specific locations and real weather patterns during and after the outages.
We found that in seven of the outages, most homes would have been able to maintain critical loads plus heating and cooling using solar with 30 kWh of storage, or just over two Powerwalls.
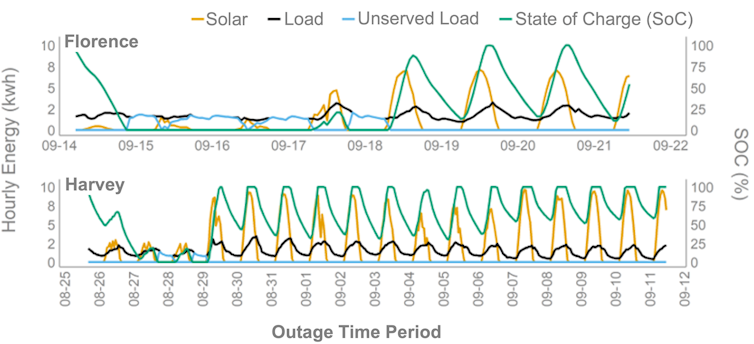
But the weather around the outage can have a big impact, especially for hurricanes. AfterHurricane Florenceknocked out power in North Carolina in 2018, cloudy skies hung around for three days, dimming or even stopping solar panels’ output.
Hurricane Harvey, on the other hand, slammed the Texas coast in August 2017 but moved on to cause widespread damage elsewhere in Texas. The skies over Corpus Christi cleared even as it took a week or more to get power restored. Solar and storage would have been a big help in that case, providing virtually all power needs for a typical single-family home, once the skies cleared.
How a typical home would have done with solar and 30 kWh of storage after hurricanes Florence and Harvey. The light blue line shows the short periods of ‘unserved load,’ or shortfalls in meeting power demand, right after the storms. The state of charge shows batteries were able to stretch solar power through the night.Berkeley Labs,CC BY
Similarly, we found solar can do well in less cloudy events, like wildfire prevention shutoffs in California, or after the 2020 derecho windstorm in Iowa.
The heat source in a home is also a key factor. In a five-to-10-day outage following an ice storm in Oklahoma in 2020, we found that solar plus a 30-kWh battery could have supplied nearly all the critical power and heat needed for homes with natural gas heaters or heat pumps. But homes with electric resistance heating would have fallen short.
In Texas, over half of the homes areheated with electricity, primarily resistance heaters. Energy Star-rated heat pumps – which provide both heating and cooling – usehalf as much electricityper unit of heat output as electric resistance heaters and are also more efficient at cooling than the average new air conditioner. Converting older resistance heaters to new heat pumps can not only save money and reduce peak demand but also increase resilience during outages.
New forms of backup
Setting up solar and storage to provide backup power in a home or building takes extra work and it costs more – just one Powerwall can runfrom US$12,000 to $16,500for a full system installation, before incentives and taxes. That’s as much as a fair-sized solar system. Nevertheless, a growing number of homeowners are installing both.
Over 90%of new solar installations in Hawaii in 2021 were paired with batteries after a regulation change. Now, these distributed power plants arehelping power the gridas coal plants are retired.
California hasover 1.5 millionrooftop solar systems. A growing number of customers are retrofitting batteries on their systems, or adding new solar plus storage, in part because utilities have resorted to “public safety power shutoffs” to lower the risk of wildfires sparked by power lines during dry, windy days.
Electric trucks and cars have much more battery storage than a Powerwall and hold potential as future home batteries as well.Ford
And new forms of backup power are emerging, especially from electric cars. Ford is partnering with SunRun to combine its new F150 Lightning electric pickup truck with solar and a two-way charger that canuse the truck’s batteryto power a house. The standard version of the truck comes with a 98-kWh battery, the equivalent of more than seven Tesla Powerwall stationary batteries.
Critical power for critical services
A fire station in Puerto Rico offers a glimpse of what solar and storage can do. After Hurricane Mariacut power for monthsin 2017, over 40,000 solar systems were installed on the island, often paired with battery storage. One of those is at the fire station in the town of Guánica, which had been unable to receive emergency calls in previous outages.
When Hurricane Fiona’s wind and flooding again knocked out power to most of Puerto Rico in September 2022, the fire station was still operating.
“The solar system isworking beautifully!” Sgt. Luis Saez told Canary Media the day after Fiona knocked out power. “We did not lose power all throughout the hurricane.”
The angle at which a solar panel faces the sun determines how much energy it will receive.
The sun provides a huge amount of energy as its rays touch the Earth’s surface. But the quantity of energy that you can harness is another matter. The efficiency of solar cells, their arrangement, and the amount of sunlight they receive all affect their output. Before deciding whether solar panels are a good choice to save you money, determine if you can fully power your home with solar panel electricity.
Step 1
Determine your solar panels’ efficiency rate. The amount of energy that can be taken in and converted into electrical energy per solar panel is its efficiency. For photovoltaic solar cells, efficiency can reach about 19 percent. But for concentrated photovoltaic cell panels or CPV panels, the efficiency can exceed 40 percent. Whether you are creating your own panels or purchasing pre-made panels, determine the efficiency per cell of the panels you plan to install. Keep in mind when choosing what type of panels to use that CPV panels usually require more work to set up, and more land, as they are designed to concentrate sunlight on a specific panel.
Step 2
Size the area for your solar panels. Determine how many panels can fit on your designated area while taking into account the terrain, local construction laws, and other spacing issues. Solar panels come in several types and dimensions but, as an example, 100-200W solar panels usually measure 1 square meter in size.
Step 3
Calculate the energy per acre. On average, 1 square meter of solar panels directly exposed to sunlight will receive about 1-kilowatt hour (kW/h) of energy per hour for the six hours it is exposed to effective sunlight, or 6-kilowatt hours of solar energy a day. One acre is approximately 4,046 square meters, so if you have an acre’s worth of solar cells, then you will receive about 4,046 kilowatt hours of electricity each hour, or 24,276-kilowatt hours a day.
Step 4
Multiply the energy you receive by the efficiency of your solar panels to discover how much usable electricity you can yield. If your solar panels are 19 percent efficient and you receive 24,276 kilowatt hours a day of solar energy, then you will receive about 4,612-kilowatt hours of usable electricity through solar energy.
Step 5
Subtract your maximum potential energy needs from the amount of energy being produced. You can find out how much energy you use by looking at a past electric bill or calling up the company that services your electricity directly. But for a general idea, the average American family uses about 920-kilowatt hours of electricity per month. So if you produced approximately 4,612-kilowatt hours of usable electricity per day, you would produce enough energy in a day to run four average households for a month.
The standard formula for rating solar panels looks at the amount of power the unit produces in full sunlight at 77 degrees Fahrenheit. However, many homeowners in northern latitudes might only reach that optimal standard for solar collection a few days per year. Suppose you live in an area where sunlight is weakened by such factors as inclement weather and the earth’s tilt, yet wish to take as full advantage of solar power as possible. In that case, you need solar panels that are optimized for better efficiency under substandard conditions.
Monocrystalline Panels
Of the three basic solar panel types–monocrystalline, polycrystalline and amorphous–monocrystalline is the most efficient in collecting solar energy and therefore somewhat more effective in regions with low sunlight. As the name suggests, they are made from a single large silicon crystal cut from an ingot. Polycrystalline panels use many small crystals to form the collection surface, while amorphous, or thin film, solar panels consist of silicon particles applied to the surface of large plates. Monocrystalline panels, while more efficient, are only slightly so. They are also the most expensive of the three types.
Hybrid Panels
Some manufacturers, including industry leader Sanyo technologies, have combined monocrystalline and amorphous thin film to produce a hybrid panel that Sanyo has dubbed Heterojunction with an Intrinsic Thin Layer (HIT). According to Sanyo’s marketing literature, these hybrid panels “boast high conversion efficiency ranging from 15.3 to 16.4, excellent temperature characteristics, and considerable output under diffuse and low light conditions.” Sanyo’s 190-watt photovoltaic (PV) module has earned a 17.4 percent efficiency rating, well above the industry average of 12 percent.
High-Powered Panels
Industry experts consider solar panels with a collection capacity of greater than 100 watts to be high-powered. The wattage of a panel describes the amount of power the panel can produce in full sunlight at 77 F. The selection of high-powered panels compatible with the typical household 12-volt system dwindles as the wattage soars upward because the highest powered panels are designed for grid-tie systems rather than stand-alone systems, which deposit the power in a battery storage bank. You must also keep in mind that two panels with lower wattage will add up to the same collection capacity and be less expensive. In the case of solar panels, bigger does not automatically equate to better.
More Options
The U.S. Department of Energy’s Efficiency & Renewable Energy Program (EERE), established to develop innovations in the solar panel field, is working to optimize solar collector efficiency. One example is an experiment using a MicroDish composed of a concentration of Spectrolab solar cells–ultra-high-efficiency cells–in which EERE tested the use of mirrors designed to multiply the sun’s power. This application is intended “to substantially increase the viability of PV for cost-competitive applications.”
On these hot summer days, the sun shines directly on your roof and has a heating effect that permeates into your home. Is it true that solar panels can cool your home? Absolutely!
A study conducted by the UC San Diego Jacobs School of Engineering completed tests with various solar panel layouts and tested roof temperatures with thermal imaging.
Solar Installation in Vancouver. Roof Thermal Imaging & Cooling effect!
Researchers discovered that exterior roof temperatures were 5 degrees Fahrenheit cooler with solar panels, as the panels blocked direct sunlight from hitting the roof. Also, the solar panels contributed to lowering roof temperatures because the panels themselves were reflecting the sun’s heat away from the building. Overall, the solar panels“reduced the amount of heat reaching the roof by about 38%!”
In addition to cooling your home during the Summer, solar panels also add an insulation value in the Winter by helping to keep warm air inside your home. How great is that? These factors alone make your home more energy-efficient and are estimated to provide a 5% payback of the solar panel system cost!
To learn more, visit ourpage for more information.
Do you have more questions about solar panels? Contact us today as we’re happy to answer your questions and even provide you with aFree Estimate!
A typical solar system has a charge controller situated between the solar panels and the battery. But is it that necessary? Can you connect solar panels directly to a battery? What would happen if you do?
A solar panel generates up to 20 volts, which is higher than the 12 volts required by a battery. Connecting the solar panels directly to the battery could overcharge and damage the battery.
What Happens If You Connect Solar Panels Directly To A Battery?
When sunlight hits the cells on a solar panel, it produces a chemical reaction and generates direct current (DC). The solar panel transmits this current into the battery. The current is used to charge the battery and can also be used to run appliances and other devices.
If the solar panel is directly connected to the battery, all of the currents are placed in the battery. A 12V battery needs only 12 volts, at most 14.4.V to charge. A 12V solar panel produces up to 20V.
If you put 20 volts in a 12-volt battery, it will overcharge. This is going to damage the battery and whatever device or appliance is connected to it.
By installing a charge controller like the Renogy 30A Charge Controller, this can be avoided. You place the charge controller between the solar panels and the battery, and it will regulate the current flowing into the system.
Why A Charge Controller Is Needed To Connect Batteries To Solar Panels
A charge controller manages the electrical current going into the battery, keeping it at a safe level. This device ensures the battery charges at the optimum level without the risk of overheating or overcharging. Some of the most important features of a charge controller are the following.
Display: the controller should display the solar panel amps, battery bank voltage, and charge level.
Customizable lighting control: for simplified operation
Auto low voltage connect / disconnect: turns on when the battery is charged and turns off when power is low
Multistate Charging: adjusts the battery power according to the battery’s charge level for optimum performance.
The battery installation depends on the solar panel system design. A lot of home solar panel systems today come with an inverter that simplifies battery configuration. If your system does not come with battery expansion capability, you have to replace the inverter.
Lead-acid batteries are the most widely and with good reason. Their electrical storage capacity is large and they discharge fast. However, lead-acid battery levels should not drop below 50% as it will shorten the lifespan.
Lead-acid batteries often have 2 V voltage and are made up of cells that generate the required power. In solar power batteries, that is 12 volts. These are called deep cycle batteries because they charge during the day and are discharged at night.
Sot the best way to avoid this is to install a charge controller. The controller will protect the battery and ensure only the right amount of current goes into the system. The following step-by-step guide shows you how it is done.
How To Connect A Charge Controller To A Battery And Solar Panel
Instead of connecting a battery directly to a solar panel, you should install a charge controller between the battery and the solar panel.The solar panel will charge the battery with current but the controller ensures only a safe amount goes into it. The following steps show how it is done.
Required Tools And Materials
Solar panel
Charge controller
Battery charge
Inverter (if you will use AC powered appliances)
Cable, wires, and connectors (these should be included in your solar panel kit)
Crescent wrench
Drill
Screwdriver
Electrical tape
Wirecutter
Eye protection (goggles are recommended when working with lead-acid batteries)
Connect the charge controller to the lead battery.
Link the lead battery into the inverter.
Connect the charge controller to the solar panels.
To run, use the inverter to convert DC to AC, Clamp to the battery and turn the inverter on.
Step By Step Instructions
1.Prepare all the tools and materials. Set up the solar panel so you can link them to the main connector later on. Layout the panels first. Depending on your setup, an extension cord may or may not be required.
The wires should be covered for protection. If the battery is not yet charged, do this first. It’s a good idea to charge the battery while you set up the solar panels to save time. Make certain the battery’s negative terminal is on one side and the positive terminal on the other.
If your battery isalready parallel, proceed to step 3. If not, cut the cables and make some jumpers. The bigger the inverter, the longer the cable, but chances are your solar panel already has cables ready.
2.Hook up the charge controller onto the lead battery.There should be a wire on the controller that you can hook up or clamp onto the battery. The inverter must be turned off first. If the controller is waterproof you can position it anywhere. If it isn’t, make sure it is in a secure location.
Charge controllers come with digital displays for easy access to your system, so the best place to install them is in your RV. When installed properly, you can use the controller to monitor the energy situation in your RV.
3.Hook up the lead battery to the solar inverter. The battery can be configured parallel to the other batteries in the system. To add more batteries, connect them with cables. Make sure the cables are linked to the proper terminals.
4. Link the battery controller to the solarpanel. Run the line from the panel to the controller and it should be set. Depending on your setup, an extension cord may be required to connect the components.
Tips And Warnings
To test the system, turn on the inverter to convert DC to AC. Clamp to the battery and then activate the inverter. If everything is in order the system should run fine. Try different devices and check for signs of problems. Here are some more suggestions:
If you already bought a solar kit, follow the instructions given. Keep in mind that some of the steps in your solar panel kit may differ slightly. If you don’t want to manually put the whole thing together, look for solar panel system kits that require very little setup.
Double-check the wiring and cables. Make certain the connectors are tight and in the proper locations.
Run a test first to see if it works. Keep an eye on the charge controller and check if it’s controlling the voltage.
If the system does not run, check the wiring or if there is a loose screw somewhere. It is also possible the batteries are not installed correctly so look there first.
Your solar system kit comes with a manual and troubleshooting guide so use that as a reference.
How Long Does A Solar Panel Take To Charge A 12V Battery?
The charging time depends on thesolar panel watt capacityand how much sunlight is available. It also depends on the battery and how much power is required.
A 12V 100ah battery holds up to 1200 watts. A 100-watt solar panel can produce 600 watts with six hours of sunlight. So if the weather is ideal, a 100W solar panel can recharge a 12V 100ah battery in two days.
That assumes the two days have full sunlight so the solar panel can produce 100 watts for six hours. In reality, this can only happen under the most ideal situations. Passing clouds, shading, and other factors affect solar power output. if the conditions are not good, it might take 3 days or so to recharge the battery.
What Are The Parts Of A Solar Power System?
Now, let’s take a look at the 4 main components: the solar panels, the charge controller, the inverter, and the battery. The following information makes it clear why you should never connect the batteries directly to a solar panel unless it runs off DC power.
Solar Panel. These are the most recognizable parts of a solar system. Also called solar stations or solar cells, these are available in different configurations. The most popular solar panels are those with 36 cells, capable of producing 18 to 21 volts.
Inverter. Solar panels produce direct current (DC) which is then stored in the battery. To use this power for home appliances, you need an inverter to convert it into an alternating current (AC). The inverter must be joined to the battery before it is connected to other AC appliances or devices.
Your solar battery generates 12-volt power, but the inverter changes this into 120 volts, making it usable and compatible with electrical devices. Inverters come in various forms and some are bundled with portable solar system kits.
Battery. The battery serves as the repository of all the energy that the solar panel produces. For RVs and home use, a12V, deep cycle batteryis recommended. These batteries can handle several discharges, which is what you’ll be needing. Without the battery, there is nowhere to store all the power the solar panel generates.
Solar Charge Controller. A battery charge controller acts as a voltage regulator for your solar power system. Think of the voltage regulator that you use with your computer and you get an idea of what a batter charge controller does.
Conclusion
Connecting solar panels to the battery is a simple, straightforward process, provided you know the steps. A lot of the mistakes people make is not taking the time to learn how a solar panel system works with batteries. By understanding the process you’ll save yourself a lot of trouble.