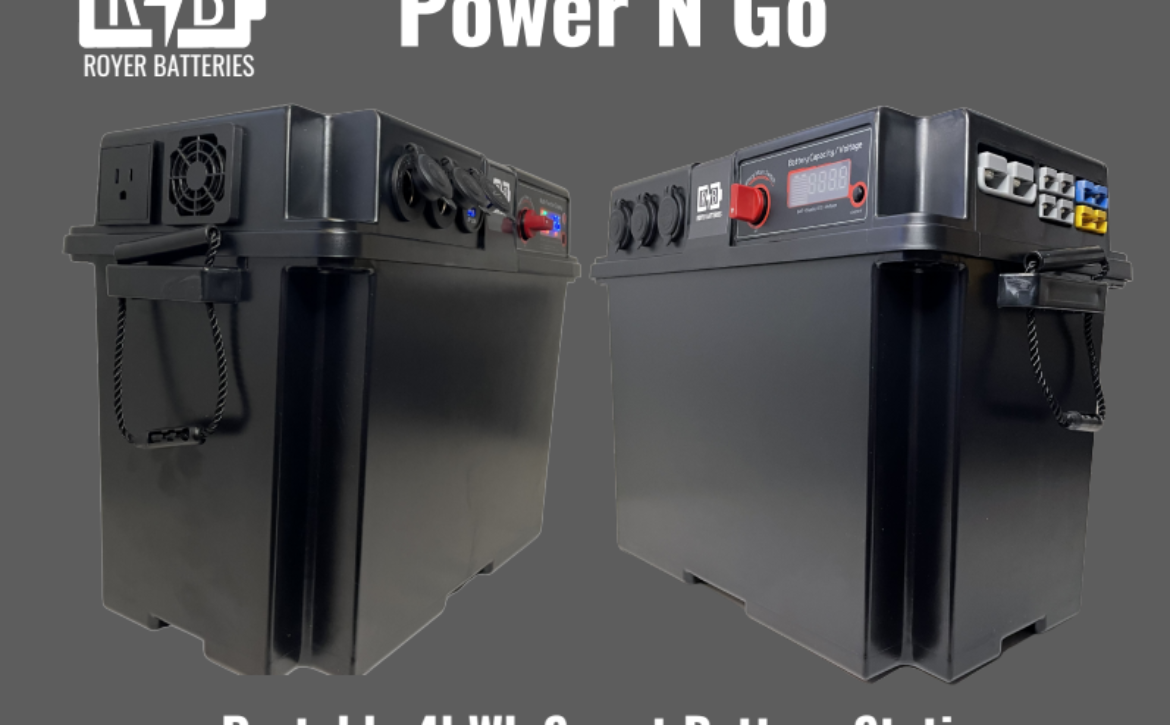
Power everywhere. Much more than just a battery and it is built in Canada. Complete customization, Portability, power, and convenience come together in this versatile power station. Optional 1000W pure sine wave inverter and MPPT/DC2DC charge controller make the Power N Go unmatched. Our smart Bluetooth BMS lets you know what’s going on at all times which comes standard with all units. LiFePO4 is some of the longest-lasting and safest lithium chemistries.
Features
The power station has a long list of features including an optional built-in 1000W (2000W peak) pure sine wave inverter to power all your AC devices on the go. Another option is the all-in-one 300W MPPT charge controller and 30A DC2DC converter and isolator. To plugin there is 1x SMH175 & 4x SMH50 Anderson connectors, 2x 12V automotive ports, 2x 2.1A USB. A hard cut-off switch and battery state indicator are built-in for quick disconnection and convenience.
Capacity
Using four of our high capacity 3.2V 310Ah prismatic cells translates into more reliability; fewer parts, fewer issues. Our cells are designed to use the full depth of discharge giving maximum capacity when required. You always have the option (through Bluetooth) to change the charging and discharging parameters to a 20%-90% cycle to extend the lifetime of the battery. Compared to lead-acid, lithium offers more than 2x more power per rated Ah as well as consistent voltage.
Cycle Life
If you use a full cycle daily, it will be 8-13.5 years until you realize a 20% capacity loss. This means with the 310Ah, after 3000 – 5000 cycles you would still have up to 248Ah of usable power. The battery can easily have a useful life of more than 10,000 cycles/25 years in most applications. This is the only battery you will need, which is why we include our 10-year warranty but do expect it to run much longer.
Smart BMS
Lithium batteries require a battery management system (BMS) to ensure proper voltage and temperature cut-offs. Separating our batteries with our smart Bluetooth BMS, you can set parameters of charging and discharging, monitor real-time usage, see available power left, and turn on and off all from your phone. At any time, you will know how much power you’re discharging or charging and how much you have left. The BMS has automatic high/low temp and voltage cut-offs to maximize your battery life. We use quality JBD BMS for our Power N Go power stations.
Temperature
LiFePO4 chemistry cannot be charged at 0 °C or discharged at -20 °C which is why our BMS disable these functions when low temperatures are detected. Depending on your battery location and climate, you may require your battery to work in colder weather. Our batteries can come with built-in automatic heating. The optional heater can keep the battery temperature above 0 °C to allow all functions to work in any weather. The heater uses very little power to keep everything warm.
Amp Rates
Our smart BMS is rated to output 150A continuous with a 300a peak (3 seconds) and charging up to 150A continuously. By paralleling units, you can multiply amperage rates by number of paralleled batteries. Please gauge your wiring accordingly to account for your expected loads.
Safety
The most important thing to all our batteries is safety. LiFePO4 is one of the safest lithium chemistries and will not catch on fire like other li-ion batteries. There is no venting or required maintenance with these batteries. Storage losses are under 3% per month so you can leave the battery dormant for long periods without issues.
Parallel/Series
Our Power N Go is capable of up to 4 series and 4 paralleled batteries. With series connections, the inverter or MPPT/DC2DC cannot be built in. If you require a specific voltage and Ah, please see ourKing-Pawnbattery system for a single BMS option for multiple batteries. We also offer a more basic 4kWh option with terminals called theTiny 12V. If you require more capacity, voltage, or anything else please contact us directly as we can do anything!
The VRFB is a type of rechargeable flow battery where rechargeability is provided by vanadium electrolyte (VE) dissolved in solution. The two tanks of Vanadium, one side containing V2+ and V3+ ions, the other side containing V4+ and V5+ ions, are separated by a thin proton exchange membrane. VRFBs consists of two tanks of vanadium electrolyte that flow adjacent to each other past a membrane and generate a charge by moving electrons back and forth during charging and discharging. This battery offers unlimited energy capacity simply by using larger electrolyte storage tanks. It can be left completely charged for long periods without losing capacity and maintenance is much simpler than other batteries. Pumps on both sides circulate the electrolyte.
The electron differential between the two cells generates electric power. Most batteries use two chemicals that change valence (or charge or redox state) and cross-contaminate and thus degrade over time. VRFBs utilize multiple valence states of vanadium as a single element to store and release charge. The VRFB has no cross-contamination like most batteries. The electrolyte in the catholyte and the anolyte consists of 100% vanadium ions. The ion-sensitive membrane separating both sides of the electrolyte tank allows only protons to pass. VRFBs are containerized, long duration, non-flammable, compact, reusable over infinite cycles, and last more than 20 years.
What are the advantages of Vanadium Redox Flow Batteries?
VRFBs have a lifespan of 20+ years
VRFBs offer immediate energy release
VRFBs are suitable for grid connection or off-grid settings – ideal for renewable energy
VRFBs can discharge 100%, without any damage to the battery
VRFBs are non-flammable
They ensure power and energy can be scaled independently
Vanadium electrolyte can be re-used and does not need to be disposed of
The batteries can be cycled more than once per day
They use only one element in the electrolyte – V2O5
VRFB energy storage guarantees uninterrupted power supply
How does a Vanadium Redox Flow battery (VRFB) work?
A flow battery is charged and discharged by a reversible reduction-oxidation reaction between the two liquid vanadium electrolytes of the battery
Unlike conventional batteries, electrolytes are stored in separated storage tanks, not in the power cell of the battery
During operation, these electrolytes are pumped through a stack of power cells, in which an electrochemical reaction takes place and electricity is produced
On these hot summer days, the sun shines directly on your roof and has a heating effect that permeates into your home. Is it true that solar panels can cool your home? Absolutely!
A study conducted by the UC San Diego Jacobs School of Engineering completed tests with various solar panel layouts and tested roof temperatures with thermal imaging.
Solar Installation in Vancouver. Roof Thermal Imaging & Cooling effect!
Researchers discovered that exterior roof temperatures were 5 degrees Fahrenheit cooler with solar panels, as the panels blocked direct sunlight from hitting the roof. Also, the solar panels contributed to lowering roof temperatures because the panels themselves were reflecting the sun’s heat away from the building. Overall, the solar panels“reduced the amount of heat reaching the roof by about 38%!”
In addition to cooling your home during the Summer, solar panels also add an insulation value in the Winter by helping to keep warm air inside your home. How great is that? These factors alone make your home more energy-efficient and are estimated to provide a 5% payback of the solar panel system cost!
To learn more, visit ourpage for more information.
Do you have more questions about solar panels? Contact us today as we’re happy to answer your questions and even provide you with aFree Estimate!
A typical solar system has a charge controller situated between the solar panels and the battery. But is it that necessary? Can you connect solar panels directly to a battery? What would happen if you do?
A solar panel generates up to 20 volts, which is higher than the 12 volts required by a battery. Connecting the solar panels directly to the battery could overcharge and damage the battery.
What Happens If You Connect Solar Panels Directly To A Battery?
When sunlight hits the cells on a solar panel, it produces a chemical reaction and generates direct current (DC). The solar panel transmits this current into the battery. The current is used to charge the battery and can also be used to run appliances and other devices.
If the solar panel is directly connected to the battery, all of the currents are placed in the battery. A 12V battery needs only 12 volts, at most 14.4.V to charge. A 12V solar panel produces up to 20V.
If you put 20 volts in a 12-volt battery, it will overcharge. This is going to damage the battery and whatever device or appliance is connected to it.
By installing a charge controller like the Renogy 30A Charge Controller, this can be avoided. You place the charge controller between the solar panels and the battery, and it will regulate the current flowing into the system.
Why A Charge Controller Is Needed To Connect Batteries To Solar Panels
A charge controller manages the electrical current going into the battery, keeping it at a safe level. This device ensures the battery charges at the optimum level without the risk of overheating or overcharging. Some of the most important features of a charge controller are the following.
Display: the controller should display the solar panel amps, battery bank voltage, and charge level.
Customizable lighting control: for simplified operation
Auto low voltage connect / disconnect: turns on when the battery is charged and turns off when power is low
Multistate Charging: adjusts the battery power according to the battery’s charge level for optimum performance.
The battery installation depends on the solar panel system design. A lot of home solar panel systems today come with an inverter that simplifies battery configuration. If your system does not come with battery expansion capability, you have to replace the inverter.
Lead-acid batteries are the most widely and with good reason. Their electrical storage capacity is large and they discharge fast. However, lead-acid battery levels should not drop below 50% as it will shorten the lifespan.
Lead-acid batteries often have 2 V voltage and are made up of cells that generate the required power. In solar power batteries, that is 12 volts. These are called deep cycle batteries because they charge during the day and are discharged at night.
Sot the best way to avoid this is to install a charge controller. The controller will protect the battery and ensure only the right amount of current goes into the system. The following step-by-step guide shows you how it is done.
How To Connect A Charge Controller To A Battery And Solar Panel
Instead of connecting a battery directly to a solar panel, you should install a charge controller between the battery and the solar panel.The solar panel will charge the battery with current but the controller ensures only a safe amount goes into it. The following steps show how it is done.
Required Tools And Materials
Solar panel
Charge controller
Battery charge
Inverter (if you will use AC powered appliances)
Cable, wires, and connectors (these should be included in your solar panel kit)
Crescent wrench
Drill
Screwdriver
Electrical tape
Wirecutter
Eye protection (goggles are recommended when working with lead-acid batteries)
Connect the charge controller to the lead battery.
Link the lead battery into the inverter.
Connect the charge controller to the solar panels.
To run, use the inverter to convert DC to AC, Clamp to the battery and turn the inverter on.
Step By Step Instructions
1.Prepare all the tools and materials. Set up the solar panel so you can link them to the main connector later on. Layout the panels first. Depending on your setup, an extension cord may or may not be required.
The wires should be covered for protection. If the battery is not yet charged, do this first. It’s a good idea to charge the battery while you set up the solar panels to save time. Make certain the battery’s negative terminal is on one side and the positive terminal on the other.
If your battery isalready parallel, proceed to step 3. If not, cut the cables and make some jumpers. The bigger the inverter, the longer the cable, but chances are your solar panel already has cables ready.
2.Hook up the charge controller onto the lead battery.There should be a wire on the controller that you can hook up or clamp onto the battery. The inverter must be turned off first. If the controller is waterproof you can position it anywhere. If it isn’t, make sure it is in a secure location.
Charge controllers come with digital displays for easy access to your system, so the best place to install them is in your RV. When installed properly, you can use the controller to monitor the energy situation in your RV.
3.Hook up the lead battery to the solar inverter. The battery can be configured parallel to the other batteries in the system. To add more batteries, connect them with cables. Make sure the cables are linked to the proper terminals.
4. Link the battery controller to the solarpanel. Run the line from the panel to the controller and it should be set. Depending on your setup, an extension cord may be required to connect the components.
Tips And Warnings
To test the system, turn on the inverter to convert DC to AC. Clamp to the battery and then activate the inverter. If everything is in order the system should run fine. Try different devices and check for signs of problems. Here are some more suggestions:
If you already bought a solar kit, follow the instructions given. Keep in mind that some of the steps in your solar panel kit may differ slightly. If you don’t want to manually put the whole thing together, look for solar panel system kits that require very little setup.
Double-check the wiring and cables. Make certain the connectors are tight and in the proper locations.
Run a test first to see if it works. Keep an eye on the charge controller and check if it’s controlling the voltage.
If the system does not run, check the wiring or if there is a loose screw somewhere. It is also possible the batteries are not installed correctly so look there first.
Your solar system kit comes with a manual and troubleshooting guide so use that as a reference.
How Long Does A Solar Panel Take To Charge A 12V Battery?
The charging time depends on thesolar panel watt capacityand how much sunlight is available. It also depends on the battery and how much power is required.
A 12V 100ah battery holds up to 1200 watts. A 100-watt solar panel can produce 600 watts with six hours of sunlight. So if the weather is ideal, a 100W solar panel can recharge a 12V 100ah battery in two days.
That assumes the two days have full sunlight so the solar panel can produce 100 watts for six hours. In reality, this can only happen under the most ideal situations. Passing clouds, shading, and other factors affect solar power output. if the conditions are not good, it might take 3 days or so to recharge the battery.
What Are The Parts Of A Solar Power System?
Now, let’s take a look at the 4 main components: the solar panels, the charge controller, the inverter, and the battery. The following information makes it clear why you should never connect the batteries directly to a solar panel unless it runs off DC power.
Solar Panel. These are the most recognizable parts of a solar system. Also called solar stations or solar cells, these are available in different configurations. The most popular solar panels are those with 36 cells, capable of producing 18 to 21 volts.
Inverter. Solar panels produce direct current (DC) which is then stored in the battery. To use this power for home appliances, you need an inverter to convert it into an alternating current (AC). The inverter must be joined to the battery before it is connected to other AC appliances or devices.
Your solar battery generates 12-volt power, but the inverter changes this into 120 volts, making it usable and compatible with electrical devices. Inverters come in various forms and some are bundled with portable solar system kits.
Battery. The battery serves as the repository of all the energy that the solar panel produces. For RVs and home use, a12V, deep cycle batteryis recommended. These batteries can handle several discharges, which is what you’ll be needing. Without the battery, there is nowhere to store all the power the solar panel generates.
Solar Charge Controller. A battery charge controller acts as a voltage regulator for your solar power system. Think of the voltage regulator that you use with your computer and you get an idea of what a batter charge controller does.
Conclusion
Connecting solar panels to the battery is a simple, straightforward process, provided you know the steps. A lot of the mistakes people make is not taking the time to learn how a solar panel system works with batteries. By understanding the process you’ll save yourself a lot of trouble.
If you frequently use utility vehicles such as pick-up trucks or golf carts, you need a sustainable source of battery power to help keep them moving and operational. That’s where the importance of lithium batteries can most benefit you. At Hub Power, we provide deep-cycle lithium batteries in BC and are a prime distributor of solar and power conversion products.
We also specialize in solar on-grid packages in BC and will detail the benefits of deep cycle lithium batteries for your utility vehicle. We’ll go over what exactly these batteries are and how they work, as well as their duration of the operation.
What Are Deep Cycle Batteries and How Do They Function?
Deep cycle batteries are premium, lightweight, and very efficient batteries that offer the most powerful options for different required usages as they’re designed to produce a steady power output over a long period of time. After the discharge has been used significantly, it’s recharged to complete the cycle. Some of the features include rapid charging, deeper charging cycles, continuous charge, and discharge capability.
How these deep cycle batteries work is through the use of lithium iron phosphate that offers improved discharge and charges efficiency. This helps with the battery’s ability for deep power cycles. While deep cycle batteries are often priced with a large price tag, they can deliver great value and benefits for your utility vehicles over time. Moreover, these types of batteries have a longer service life compared to other lead-acid or lower quality lithium batteries and require little or no maintenance. It’s overall a worthwhile investment for people managing different vehicles and a great long-term solution.
What Is The Lifespan Of A Deep Cycle Battery?
So how long do deep cycle batteries last? As we mentioned before, they can power your utility vehicle for a long time. Depending on how you use it and how powerful the battery is, the life cycle can last you several charging cycles. You also have to consider temperatures and other factors before you use the battery.
Deep cycle batteries currently average around 2,000-4,000 charging cycles at 80% of rated capacity. This is better in comparison to the 400-1,500 cycles you would get from lead-acid batteries. By a rough estimate, deep cycle lithium batteries can last you five years or more of functional operation in contrast to just two years from lead-acid batteries. They also need to be maintained and may require water replacement to avoid serious structural damage in the future. Otherwise, you may risk shortening their lifespan.
What Is The Difference Between A Lithium Battery And A Deep Cycle Battery?
Standard lithium batteries and deep cycle batteries have many similarities and differences and both have their strengths and weaknesses. We’ve gone over a few of them already, but it’s worth repeating if you want to base your decision on the details.
Deep cycle batteries weigh 30% less than lithium acid batteries and can reach 100% charge and discharge with around 80% of great efficiency. They also have longer charging cycles than lithium batteries and offer strong stability in terms of voltage power.
While lithium batteries are cheaper than deep cycle batteries, investing in the latter can greatly benefit you in the long run. Moreover, lithium batteries and other similar products have dangerous lead content that can be dangerous for yourself and the environment. Deep cycle batteries use sustainable lithium technology that is cleaner and safer for the environment than other products.
All in all, you will find many uses and benefits if you consider purchasing deep-cycle lithium batteries for your utility vehicles. While it may be an investment, you can be assured that you’ll get great results from your purchase.
Tags:
AC TO DC CONVERTERS AUTOMOTIVE STARTING BATTERIES BCBACKUP POWER BATTERIES DISTRIBUTORBATTERY CHARGERS BURNABY BCBATTERY MONITORING BCBC | SOLAR PANELS AND KITSCRITICAL BACKUP POWER PRODUCTSDEEP CYCLE BATTERIES BURNABY BCDEEP CYCLE LITHIUM BATTERIES BCGOLF CART LITHIUM BATTERIES BCLITHIUM BATTERY FOR A SCOOTER IN BCLITHIUM SOLAR BATTERIESMARINEMARINE BATTERIES BCMARINE STARTING BATTERY BCMOTIVE BATTERIESMOTORHOME SOLAR BCOFF-GRID CABINSOFF-GRID HOME BATTERIES BCPOWER PRODUCTS BURNABY BCPOWER PRODUCTS DISTRIBUTOR BCRVRV SOLAR MOUNTS BCSOLAR AND POWER CONVERSION PRODUCTS BURNABY BCSOLAR CABIN PACKAGESSOLAR CHARGE CONTROLLERSOLAR CHARGERSSOLAR INVERTER BCSOLAR INVERTERS BCSOLAR MOUNTING HARDWARESOLAR MOUNTING HARDWARE BCSOLAR OFF-GRID CABINSOLAR ON-GRID PACKAGES BCSOLAR ON-GRID PACKAGESSOLAR PANEL SALES CANADASOLAR PANELS BCSOLAR PANELS BURNABY BCSOLAR PANELS FOR CABINSOLAR POWER FOR CABINS BCSOLAR POWER PRODUCTS DISTRIBUTOR BCSOLAR RV PACKAGESSOLAR RV PACKAGES BC
With energy bills on their way up again from April, homeowners are looking skywards to try and ease the pressure on their budgets – by installing solar panels.
And with homeowners increasingly working from home, and therefore using more energy during the day, many are looking at installing panels to cut costs, and even earn from the energy they generate.
Thomas Newby, chief executive of Leeds-based renewable energy company egg, says they received the same number of inquiries in the first nine days of this month as they did in the whole of November.
“Many consumers are still on fixed deals but which will likely come to an end shortly, so I expect we may see a further increase in demand in the coming year,” he says.
What it costs
Solar panels convert energy from the sun into electricity. Stronger sunlight creates more electricity, which can then either be used in your home or exported to the national grid.
But installing them comes at a cost. The average bill reaches almost £5,000 and rising labor bills and shortages of photovoltaic panels mean prices are going up.
Domestic systems are generally made up of between 10 and 15 panels, each of which generates between 200W and 350W of energy, according to theEnergySaving Trust, a charity promoting energy efficiency. The more panels on the roof, the higher the installation cost but also the potential for more energy.
The average price for an installation of a 3.5kW system is £4,800, including labor. This tends to be about 12 panels.
“This is the average size for domestic systems in the UK,” says Brian Horne, senior insight and analytics consultant at the Energy Saving Trust. “The amount you pay for installation will be influenced by the size of the system, and will also be affected by any difficulty with access to your roof.”
This price does not include the cost of a battery, which allows solar energy to be stored for use at a later time. They range between £1,200 and £6,000, according toGreenMatch, which compares green energy products.
Although prices for solar systems have come down over the last decade, the increased cost of labor as well as the shortage inpanels from Chinarecently, has sent costs on the way back up, says Newby. “That’s as a result of some increase in material prices but, more generally, it is labor. That’s a big part of the job.”
Planning and permissions
The ideal roof for solar panels is south-facing. East- or west-facing roofs yield up to 20% less energy; north-facing ones are the least productive anddeemed to be impractical in the UK.
For a 3.5kW system, you need room for 15 to 20 sq meters of panels. The best results will be achieved from a roof angled at 30 degrees. Most UK roofs are between 30 and 45 degrees, according to consumer group Which?.
Solar panels are classed as permitted developments so in most cases will not require planning permission. However, if you live in a listed building or a conservation area, there may be restrictions. It is best to contact your local council to be absolutely clear.
When solar panels are to be installed, the company which brings electricity to your home – the Distribution Network Operator (DNO) – must be informed. The Energy Networks Association has an online tool that, by entering your postcode, will tell you which company operates in your area.
If a solar system is above a certain size, prior permission is needed from the DNO and can take up to three months to obtain, according to Newby. After the preparation for putting the system in place is complete, installing the panels can take one to two days.